Post by NintendoNerds on Mar 12, 2008 12:02:55 GMT -5
*****READ THIS FIRST*****
Guide Created By: NintendoNerds.com
Guide Created On: 03/12/08
Total Research Time: 10 Minutes
Awesomeness: 10/10
First things first. If you didn't know this already, Super Smash Bros. Brawl has a game feature that allows you to take screenshots during game play. I'll be the first one to admit that I am a Smash Bros. noob so I don't know alot about the game and all of it's features...yet. What I do know is this...the Wii console has a slot for a Secure Digital (SD) card capable of up to 2GB of memory for data storage. What does this mean? Well, it means alot of different things. Primarily, for the purpose of this thread it means that we can store our Smash Bros. Brawl screenshots on our SD card. WOW...now THAT is cool!!
Why is this so cool?? It's cool because you can access your SD card (with the screenshots, remember?) via a few clicks on your computer. Are you scratching your chin yet? Are the gears starting to turn, grind, and smoke up there (in your head) yet?
So how do we do it? It's a relatively simple process once you've saved your SSBB screenshots to your SD card. Below are a few simple steps to learning how to view your priceless screenshots on your computer to edit, share, and collect
 Let's get started shall we?
****************************************************
1) SAVE screenshots onto your SD card while playing. The screenshot option can be accessed by pressing the start (on the GameCube controller) during game play. To take a picture, press the "Z" button on the GameCube controller. Once you take a picture you can either save it to your SD card or your Wii. Save it to your SD card.
*****
2) INSERT SD card into the SD card slot on your computers card reader. If your computer does not have a card reader that supports SD cards you have a few options. You can either buy an SD card reader for your computer or if your digital camera takes an SD card, you can connect your camera (with SD card inserted into camera) to your computers USB port.
*****
3) CREATE a folder on your C Drive called "Bin2Jpg" Don't put anything in there yet, just create the folder.

*****
4) ACCESS your SD card by navigating to "My Computer" on your computer. Once you have inserted the SD card into your computer, the SD card can be viewed in "My Computer". Once you see your SD card, you should see a folder labeled "private". This is where the Wii stored the screenshots you took earlier during your game play. Just keep opening the folders until you see a bunch of files. These are the actual screenshot files. Don't double-click them because they are not picture files...yet. The Wii actually (for whatever reason) saves the screenshots as a .BIN file.
*****
5) COPY all of your .BIN files to the folder labeled "Bin2Jpg" that you created earlier on the C Drive.

*****
6) DECRYPT and convert the .BIN files to .JPG files. The .JPG is the actual format for the pictures that we will see later. We have to convert the .BIN files to .JPG files by using a program called "bin2jpg SSBB image decrypter" This program was developed by GTCoder so all credit goes to him for this handy little converter program. The program is in .ZIP format. Download the program here:
dl.qj.net/bin2jpg-SSBB-image-decrypter-Wii-Homebrew/pg/12/fid/16097/catid/526
Once downloaded, execute the .ZIP file by double-clicking it. Once it opens, you should see these files:

Copy (or extract) all of these files to the folder you created on your C Drive called "Bin2Jpg"

*****
7) OPEN the command line prompt by going to START>RUN and typing "CMD". This will open the command line in a new window.

On the command line type "cd\Bin2Jpg" to access the folder you created earlier. You should see something similar to this:

*****
8) TYPE "bin2jpgall.bat" to initialize the conversion process. This process will convert all of the .BIN files to actual .JPG pictures, making them viewable. The conversion process will look something like this:

Once the process is complete, you will see the pictures in the folder. At this time, feel free to rename them to whatever you want.
Pretty easy huh? There are only 8 steps you need to follow to get this show on the road.
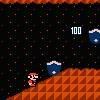
Hre's an example of how the screenshots look once converted:

Pro's:
- Great way to create screenshots
- File sizes are relatively small (about 80KB)
- Images are nicely sized at 640x480
- Image quality looks great
- Conversion software is FREE
Con's:
- BIN2JPG program does not have an easy-to-use interface, which makes it intimidating for most users to use. The developer is supposed to be modifying the program to incorporate a graphical user interface (GUI).
Feel free to comment and make any suggestions to this guide.
Please link this thread when using this guide elsewhere.
Enjoy everyone...